For junior Squash players maintaining their skills off the court is a challenge especially if they have a limited amount of time on the court or a chance to practice individually.
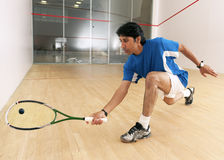
To combat this there are a number of Squash drills that Squash coaches recommend to most junior players which they can perform as a part of a sort of ‘homework’.
Whether in the comfort of the family home (if you have a garden) or outdoor in a local park or perhaps with an adult (who is a Squash fan) to practice in order to become a better and more skillful player in Squash:
1 – Warming up the Ball
The first drill is not a complicated one. Once you have finished warming the ball up, adopt a side-on stance a few metres away from the front wall.
With a slightly open racket face, you then begin to hit the ball above the service line. For those who are not familiar, the service line is the middle line on the front wall.
Remember, you are not driving the ball just yet. There are no dramatic swipes needed. Just hit the ball hard enough to strike the front wall above the service line, more or less in the middle of the court.
It will not look or feel exciting but the objective of this drill is to hit the ball above that service line 25 consecutive times. No misses and just one bounce every time. You are essentially teaching yourself to strike the ball consistently.
You will also get used to the idea of being on a squash court and get used to the idea making regular contact with the ball.
With this drill, is learning to bend your knees at just the right time, and to get your racket under the ball.
2 – Hand eye-coordination

In all hand-eye coordination sports, balance is everything. This definitely applies to squash. This drill will teach you how to maintain balance. It will feel uncomfortable at first.
Start with standing halfway between the front wall and the T-line; plant your back foot in line with the inner side of the service box. Do not move out of it.
Throughout this drill, your back foot will remain planted while you will incorporate everything else that you have practiced until now.
To measure your success from this drill, aim to set for you here perhaps 20 consecutive shots…and try not to fall over.
3 – Forehand Practice
Once you are comfortable with drills 1 & 2, you need to start upping the stakes somewhat and become a little more acquainted with the forehand sidewall. Stand a few feet from the sidewall on the forehand side, with your shoulders parallel to the sidewall.
What you are essentially doing now, is teaching yourself to hit the ball a lot straighter and more consistently. Among the keys here is to incorporate everything that you practiced in the first four drills.
By bending the knees a little, hit the ball above the service line and try to keep it close to the wall. The target here is still 25 shots. If the ball stays close to the sidewall, we call this playing it ‘tight’.
When you are ready, you can also up the stakes somewhat and look at completing 30 shots with no mistakes.
4 – Service Line shots
You are no doubt tired of that service line by now if you have been thorough with all of your previous drills. This drill gives you a rare opportunity to go below the belt, so to speak.
For the first time, as a beginner, we are allowing you to hit the ball below the service line.
Incorporating everything you have practiced, the time has now come to hit one ball above the service line and then one ball below the service line.
At this point, you are becoming a slightly more developed player, and the demands you place on yourself should be a little higher.
To be truly satisfied with the level of your development, professional Squash coaches suggest that you hit in the region of 50 alternating shots with no mistakes.
Do not forget the lunges; do not forget the slightly open racket face. Efficient movement, as is always the case in squash, remains everything. Above all else, you want to establish a decent level of ball striking control.
5 – Target Practice

Here is a little target practice. You can use a cone or a shoe for this drill. Essentially anything, that will be quite difficult to hit off the wall.
Place the target halfway between the front wall and the T-line for this drill. Also, place it right up against the sidewall.
Your goal is to hit the ball high up into the front wall and see if you can get it to land on the target, on the way back. In squash, it is not just about hitting the front wall – as you probably already know – but it is about hitting the front wall and knowing where the ball will land next.
This drill puts you in more control of your game, and the more you hit the target, the better the prospects for your game. A little accuracy never hurt anybody in squash.
6 – Mastering the Squash grip
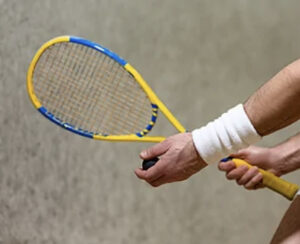
Of all the Squash drills junior players must perfect is mastering a Squash grip – for any junior Squash player mastering this aspect of the game can be off-putting for them, hence the whole point of the first three drills was to get used to the idea of striking the ball regularly.
A previous blog we did on Squash tips looked at the importance of mastering holding a Squash racket. Getting used to gripping your racquet and to some degree the thrill of hitting a squash ball is important to practice in order to become a better player.
The first thing you need to do is hold your racket out in front of your chest in a vertical position. Therefore, make sure your racket strings should be facing any one of the walls and the frame should be facing the floor.
Just like the first 3 drills in the post, you have already been holding your racket face open, virtually by default. So, adopt a similar principle here. Tilt the racket face backward about 25 degrees.
With the racket tilted back ever so slightly, grab the grip with your dominant hand as if you were shaking somebody’s hand.
Once your hand is wrapped around your grip, the lower three fingers should essentially be glued together, while your index finger should be slightly higher than normal – almost wrapped around the shoulder of the racket.
The key goal of tilting your wrist is achieving some level of stability. Once you have done this, start implementing the drills you worked on earlier.
To find your grip style, try to clear the service line, and strike the ball 25 consecutive times without allowing the ball to bounce twice. With time, that grip will become second nature.
Once you become more confident, you can then start hitting the ball against the front wall without letting the ball bounce at all.
Practice makes perfect
Like most things, practice makes perfect, as junior Squash with our sport you can make rapid progress and even perform with confidence in coaching sessions.
In any of these drills, you can practice alone, and improve without the need for anyone else to be there.
To sum up, knowing you can practice off the court at least 3 of these drills can help improve your mindset going into a tournament or even better in the lead-up to your game too.